Turn real world places into downloadable Minecraft Java Edition worlds.
Complete workflow
Minecraft world generator from real maps: practical MaptoCraft guide
This guide is for players who want to turn a real map area into a Minecraft Java Edition world, not just
read a feature list. It walks through the first MaptoCraft run, the settings that keep generation reliable,
what the downloaded ZIP contains, and the problems to check when a real-world map does not convert the way
you expected.
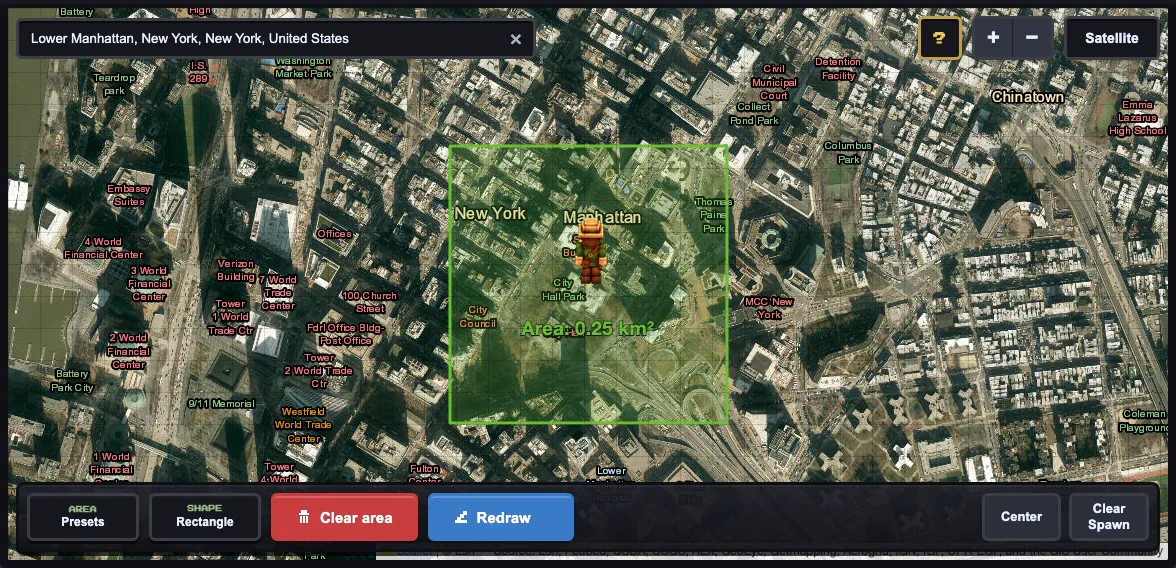
A compact Lower Manhattan map selection using the Tiny 500 m preset. Start with the area first; a
focused city block is easier to generate and inspect than a multi-kilometer city selection.
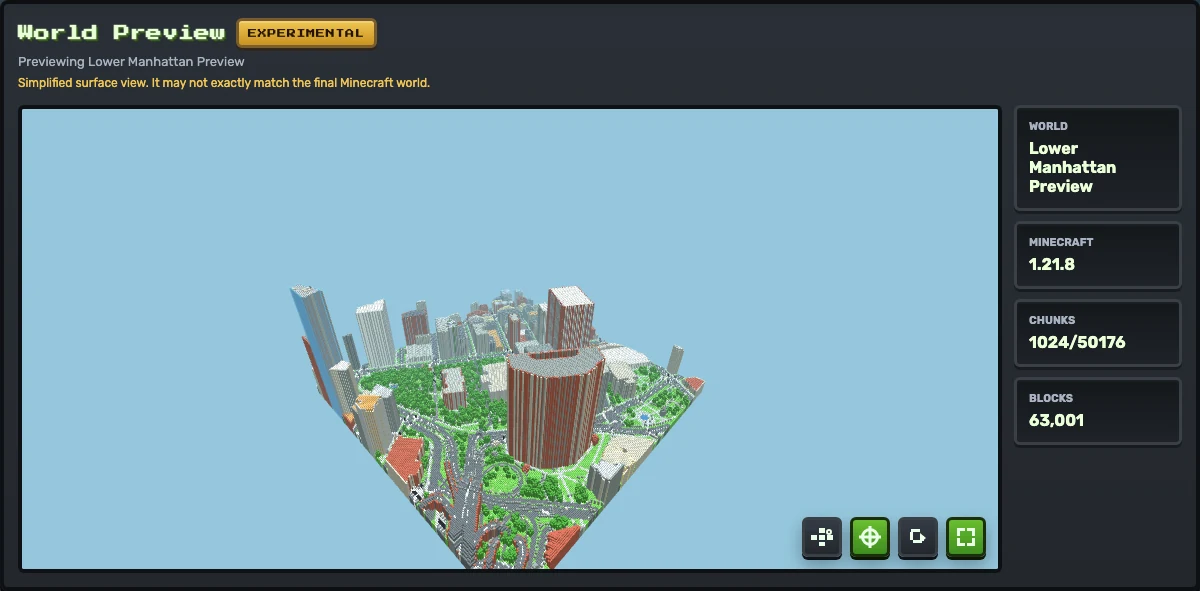
Actual MaptoCraft preview output from that Lower Manhattan run. The preview is the sanity check:
inspect the shape, spawn context, and chunk stats before downloading the Java Edition ZIP.
Who this workflow is for
MaptoCraft is most useful when you want a recognizable real-world layout inside Minecraft Java Edition:
a city block, campus, landmark, town center, park, or neighborhood. It uses public map data as the
source, runs the generation in the browser, and packages the result as a downloadable world ZIP.
It is not a magic scan of every real-world detail. The output depends on the mapped roads, buildings,
paths, land features, elevation data, and generation options available for the selected area. Treat the
first run as a sanity check: pick a small place, generate, preview, then scale up.
Recommended first-run settings
Area
Use the Tiny 500 m preset for the first run. Move to 1 km only after the result looks useful.
Terrain
Keep terrain off for the first test unless the place is defined by hills, cliffs, or valleys.
Scale
Start at scale 1. Higher scale creates bigger worlds and increases memory/runtime cost.
Ground level
Use the default ground level first. Adjust it later only if the generated world feels too low or high.
Buildings
Keep roofs on. Enable interiors only when you want extra structure detail and can accept slower generation.
Spawn
Place the spawn inside the selected area, then use the preview to confirm the start point makes sense.
Practical rule: if you are unsure, generate a 500 m flat test first. That one run tells
you whether the map data is detailed enough before you spend time on terrain or a larger area.
Step-by-step MaptoCraft workflow
Search for a place by name, landmark, or address. If search misses, navigate manually on the map.
Switch between satellite and street map views to understand the area before selecting it.
Open Area Presets and choose Tiny for a fast first pass, or Small for a slightly wider neighborhood.
Keep Rectangle mode for the first run. Use Polygon only when you need to avoid water, empty land, or unrelated blocks.
Pick a spawn point near the place you care about, then center it if you only need a safe default.
Open Generation Options only for settings you actually need to change. Avoid changing many controls at once.
Generate, wait for the browser worker to finish, and use Preview before downloading if the result is available.
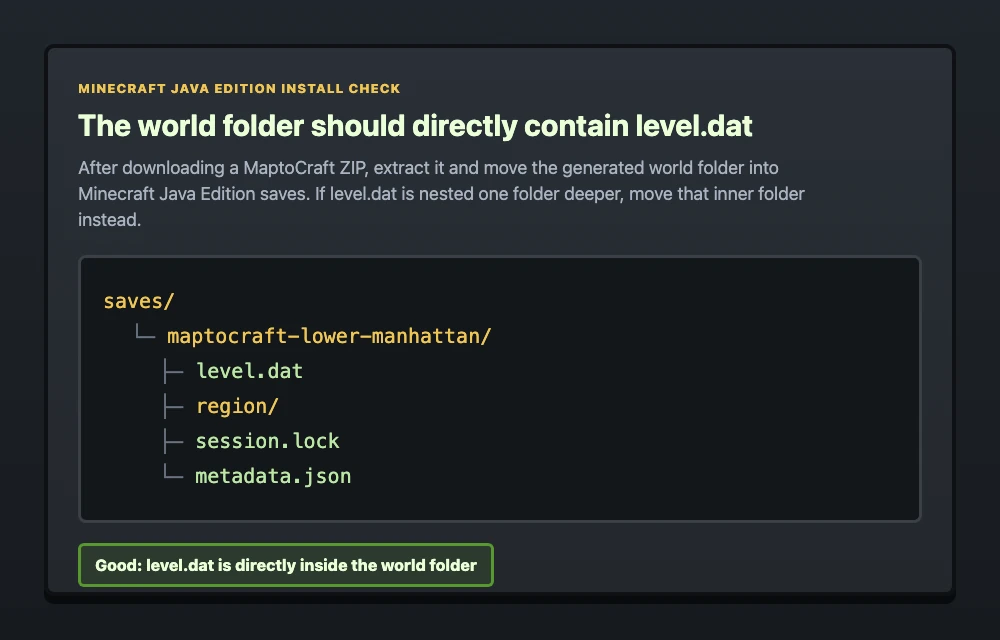
Download the ZIP, extract it, then move the world folder into Minecraft Java Edition saves.
The install check is simple: the folder you move into saves should directly contain
level.dat. If level.dat is inside another nested folder, move the inner folder.
What the download contains
The MaptoCraft ZIP is built for Minecraft Java Edition. A successful download includes generated region
files under region/, a level.dat file, a session.lock, and
metadata used by MaptoCraft to describe the generated bounds. After extracting the ZIP, move the world
folder into your Minecraft Java Edition saves directory.
Real-map generation can fail for reasons that are not obvious from the search box. If a generation looks
empty, try a smaller selection with obvious roads and building outlines. If the browser becomes slow,
reduce area size before reducing quality. If terrain fails, turn terrain off and confirm the flat map
works first.
No useful buildings: the source map data may be sparse. Try a denser nearby area.
Long terrain run: terrain fetches elevation tiles. Use a smaller area or flat mode.
World missing in Minecraft: check the folder nesting and confirm level.dat is in the world folder.
Spawn feels wrong: regenerate with a clearer spawn point inside the selected area.
Use the Tiny 500 m preset, terrain off, scale 1, and a place with visible roads or buildings. This is small enough to generate quickly and large enough to judge the result.
Does MaptoCraft create a normal Minecraft Java Edition save?
Yes. The ZIP contains Java Edition world files such as level.dat, region files, session.lock, and metadata.
Why did my generated world fail or look empty?
Common causes are a selection that is too large, sparse map data, network limits while fetching OpenStreetMap data, or terrain settings that request too many elevation tiles.
Can I generate a large city right away?
A small test is safer. Generate a 500 m or 1 km area first, inspect the preview, then increase the area only after the data and settings look useful.